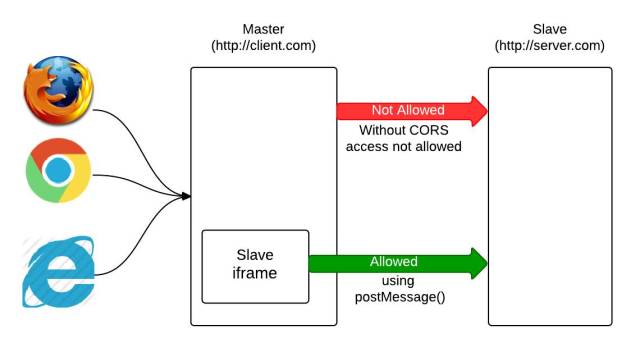
跨域请求
同源策略
同源策略是来自浏览器的,为保障浏览器执行javascript代码中访问后端API请求的 协议 域名 端口 与前端服务器相同而设置的策略,此策略是用来确保安全的。
| 比较项 | 描述 | 示例 | 是否同源 |
|---|---|---|---|
| 协议 | 比较两个URL的协议是否相同 | http://example.com vs. https://example.com |
否(协议不同) |
| 域名 | 比较两个URL的域名是否相同 | http://example.com vs. http://sub.example.com |
否(域名不同) |
| 端口 | 比较两个URL的端口是否相同 | http://example.com:80 vs. http://example.com:8080 |
否(端口不同) |
| 同源示例 | 完全相同的协议、域名和端口 | http://example.com:80 vs. http://example.com:80 |
是(完全相同) |
| 协议不同 | 只有协议不同,但域名和端口相同 | http://example.com:80 vs. https://example.com:80 |
否(协议不同) |
| 子域名不同 | 主域名相同,但子域名不同 | http://example.com vs. http://sub.example.com |
否(子域名不同) |
| 端口不同 | 协议和域名相同,但端口不同 | http://example.com:80 vs. http://example.com:8080 |
否(端口不同) |
| 跨域访问 | 不同源之间的访问 | http://example.com vs. http://anotherdomain.com |
否(域名不同) |
| 文件访问 | 同一域名但不同文件之间的访问 | http://example.com/dir/page.html vs. http://example.com/dir2/otherpage.html |
是(同一域名) |
| 协议、域名、端口相同 | 完全相同的协议、域名和端口 | https://example.com vs. https://example.com |
是(完全相同) |
为什么要跨域?
你的应用开发选择了前后端分离的方案,导致前端和后端不是同源的情况下,此时需要前端跨域访问后端。
解决方案
代理
Nginx(静态服务器代理)
使用Nginx服务器代理访问后端服务器,一般前端的静态文件放置于Niginx服务器目录下,此时的后端服务器可能与前端在同一服务器,也可以是不同的服务器,但经过Niginx会将前端请求带有类似
/api的请求发送到后端服务器,将避免浏览器同源策略。
后端服务器代理
使用 Node.js 和 Express
后端服务器将检测拦截浏览器带有类似
/api的请求,将其代理至指定后端服务器https://target-server.com
假设我们使用 Node.js 和 Express 来设置一个简单的代理服务器。
- 安装所需的 npm 包
首先,需要安装 express 和 http-proxy-middleware:
1 | npm install express http-proxy-middleware |
- 创建代理服务器
创建一个 server.js 文件并添加以下代码:
1 | const express = require('express'); |
- 运行代理服务器
在终端中运行代理服务器:
1 | node server.js |
- 前端请求
在前端代码中,将请求的 URL 更改为代理服务器的地址。例如,如果代理服务器运行在 http://localhost:3000,则前端代码可以这样写:
1 | fetch('http://localhost:3000/api/endpoint', { |
前端服务器代理
此时的前端服务器是可以处理逻辑的,而不是静态服务器那样只负责响应静态件,这样的环境其实就是前端开发环境下的web服务器,当dev环境下启动前端web服务器就可以支持代理服务器的逻辑(使用 webpack-dev-server 配置代理),此时无论是请求前端服务器/后端API都是同源。
webpack-dev-server 作为一个 Node.js 服务器运行在本地,它使用 webpack 来打包和提供静态资源,并提供了一些额外的开发工具和功能。以下是它的基本工作流程:
- 启动服务器:
webpack-dev-server启动一个本地服务器,通常在localhost和指定的端口(如http://localhost:9000)上运行。 - 打包资源:使用
webpack将前端代码打包成可供浏览器使用的静态文件(如 HTML、CSS、JavaScript)。 - 提供静态资源:将打包后的静态文件提供给浏览器访问。
- 代理请求:通过代理功能,将某些请求转发到其他服务器(例如后端 API 服务器),以解决跨域问题。
- 热模块替换(HMR):在代码变更时,自动重新加载或热更新页面,而不需要手动刷新浏览器。
配置和使用
以下是一个典型的 webpack.config.js 文件,配置了 webpack-dev-server 和代理功能:
1 | const path = require('path'); |
启动开发服务器
在项目根目录运行以下命令启动 webpack-dev-server:
1 |
|
前端请求示例
在前端代码中,可以直接向 /api 发送请求,不需要考虑跨域问题:
1 | fetch('/api/endpoint', { |
总结
- 运行环境:
webpack-dev-server运行在本地 Node.js 环境中,不是在浏览器端运行。 - 功能:它提供了静态资源服务器、代理功能、热模块替换等,帮助前端开发者加速开发流程。
- 跨域解决:通过代理功能,
webpack-dev-server可以将前端的请求转发到目标服务器,从而解决跨域问题。
CORS(跨域资源共享)
跨域资源共享,从字面意思理解是不同前端共享后端服务资源,但需要进行跨域访问才可以实现其特性。
后端添加服务器响应头,类似Access-Control-Allow-开头的响应头来允许哪些前端可以进行访问此后端,实现此后端资源允许共享给某些前端服务器的IP/域名,换句话说,此响应头的作用是为了防止其他不明来历的前端IP/域名滥用我们的后端资源。CORS 策略是浏览器实现的,后端只需要允许使用即可。
允许的域名
- 可以指定一个特定的域名,也可以使用
*来允许所有域名,会造成接口的滥用等安全风险。
1
2<!-- 只允许来自https://example.com前端的脚本访问本后端资源 -->
Access-Control-Allow-Origin: https://example.com- 可以指定一个特定的域名,也可以使用
允许的 HTTP 方法
- 使用
Access-Control-Allow-Methods头字段来指定允许的 HTTP 方法,如 GET、POST、PUT、DELETE 等。
1
2
Access-Control-Allow-Methods: GET, POST, PUT, DELETE- 使用
允许的请求头
- 使用
Access-Control-Allow-Headers头字段来指定允许的自定义请求头。
1
2
Access-Control-Allow-Headers: Content-Type, Authorization- 使用
允许携带凭证(如 Cookie)
- 使用
Access-Control-Allow-Credentials头字段来指示是否允许携带凭证。
1
2
Access-Control-Allow-Credentials: true- 使用
预检请求缓存时间
- 使用
Access-Control-Max-Age头字段来指定预检请求(OPTIONS 请求)的结果可以缓存多长时间(以秒为单位)。
1
2
Access-Control-Max-Age: 3600- 使用
示例
假设后端使用 Express.js 来设置 CORS 头:
1 | const express = require('express'); |
处理预检请求
当浏览器发送跨域请求时,特别是对于非简单请求(如使用自定义头部、PUT 或 DELETE 方法等),会首先浏览器自动发送一个预检请求(OPTIONS 请求)来检查服务器是否允许该跨域请求。
1 | // 处理预检请求 |
前端请求配置
在前端发送跨域请求时,确保将 credentials 设置为 include 以发送 Cookie 或其他凭证。
1 | fetch('https://your-backend-domain.com/api/data', { |
通过以上配置,可以实现跨域请求,并且确保在响应头中正确设置了 CORS 头部,从而允许特定域名的跨域访问。


