了解Spring框架 什么是Spring
Spring是分层的JavaSE/EE full-stack 轻量级开源框架,以IoC(Inverse of Control 控制反转)和AOP(Aspect Oriented Programming 面向切面编程)为内核,使用基本的JavaBean来完成以前只可能由EJB完成的工作,取代了EJB的臃肿、低效的开发模式。
在实际开发中,通常服务器端在采用三层体系架构,分别为表示层(Web)、业务逻辑层(Service)、持久层(Dao), Spring对每一层都提供了技术支持。
表示层:在表示层提供了与Struts等框架的整合
业务逻辑层:在业务逻辑层可以管理事务、记录日志等
持久层(Dao即DataAccessobjects 数据存取对象):在持久层可以整合Hibernate、JdbcTemplate等技术
Spring具有简单、可测试和松耦合等特点。Spring不仅可以用于服务器端开发,也可以应用于任何Java应用的开发中,以下是它的7大优点:
非侵入式设计
方便解耦、简化开发
支持AOP(Aspect Oriented Programming java的面向切面编程)
支持声明式事务处理
方便程序测试
方便集成各种优秀框架、
降低Java EE API的使用难度
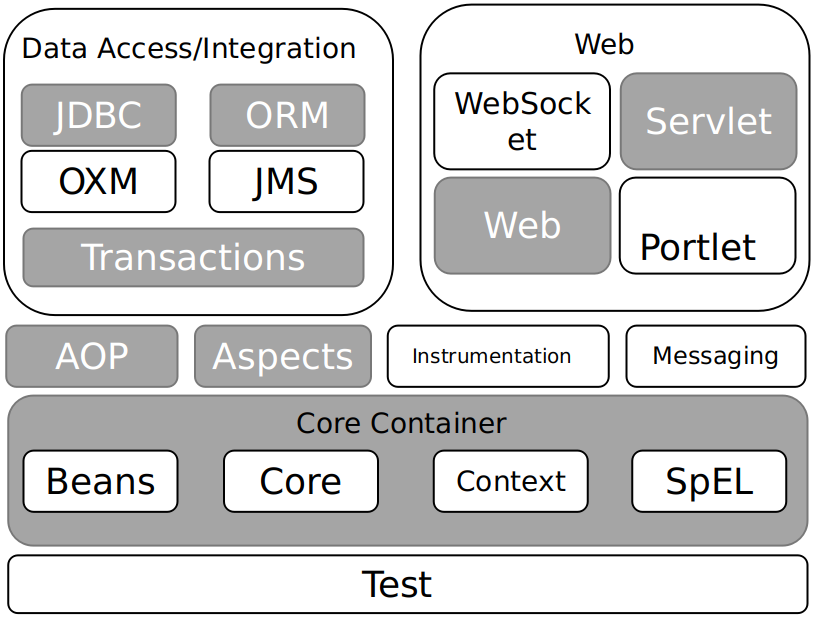
Spring的体系结构
以下提及的模块只是重要的模块,其他不重要的若有兴趣请自行百度
导入Spring框架包
需要下载Spring框架包地址:https://repo.spring.io/simple/libs-release-local/org/springframework/spring/ 选择合适的版本,以下使用的Spring4.3.10https://mirror-hk.koddos.net/apache//commons/logging/binaries/commons-logging-1.2-bin.zip
Bean的装配方式 基于XML方式装配 基于Annotation(译:注解)的装配方式
基于XML的装配可能会导致XML配置文件过于臃肿,给后续的维护和升级带来一定的困难。为此,Spring提供了对Annotation(注解)技术的全面支持
主要注释:
@Component:用于描述Spring中的Bean,它是一个泛化的概念。
@Repository:用于将数据访问层(DAO DataAccessobjects 数据存取对象)的类标识为Spring中的Bean
@Service:用于将业务层(Service)的类标识为Spring中的Bean
@Controller:用于将控制层(Controller)的类标识为Spring中的Bean 。
@Autowired:用于对Bean的属性变量、属性的setter方法及构造方法进行标注,配合对应的注解处理器完成Bean的自动配置工作。
@Resource:其作用与Autowired一样。@Resource中有两个重要属性:name和type。Spring将name属性解析为Bean实例名称,type属性解析为Bean实例类型。
@Qualifier:与@Autowired注解配合使用,会将默认的按Bean类型装配修改为按Bean的实例名称装配,Bean的实例名称由@Qualifier注解的参数指定。
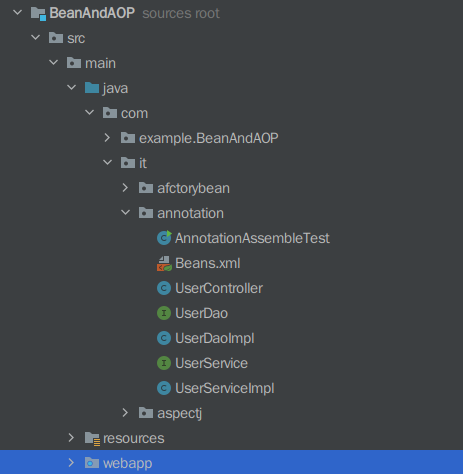
在Module新建两个接口com/it/annotation/UserDao.java、com/it/annotation/UserService.java:
1
2
3
4
5
6
package com.it.aspectj.PointCutClass;public interface UserDao { public void save () ; }
1
2
3
4
5
package com.it.annotation;public interface UserService { public void save () ; }
分别创建以上的实现类:
1
2
3
4
5
6
7
8
9
10
11
12
package com.it.annotation;import org.springframework.stereotype.Repository;@Repository("userDao") public class UserDaoImpl implements UserDao { @Override public void save () { System.out.println("UseDao Save!!" ); } }
以上的@Repository相当于在JavaBean的xml配置文件中写入了一个Spring中的Bean,例如:<bean id="userDao" class="com.it.annotation.UserDaoImpl"/>,只不过这个Bean标注属于数据访问层的
1
2
3
4
5
6
7
8
9
10
11
12
13
14
15
package com.it.annotation;import org.springframework.stereotype.Service;import javax.annotation.Resource;@Service("userService") public class UserServiceImpl implements UserService { @Resource(name="userDao") private UserDao userDao; @Override public void save () { this .userDao.save(); System.out.println("UserService Save!!" ); } }
以上的@Resource标签的作用就是读取Bean配置文件.xml,获取Beans后找到有一个名为UserDao的Bean,然后将这个Bean传入UserServiceImpl.class中存入私有变量userDao中去,相当于xml配置文件中的:
1 2 3 4 <bean id ="UserDao" class ="com.itheima.ioc.UserDaoImp" /> <bean id ="DiTestPrint" class ="com.itheima.ioc.DIserviceImp" > <property name ="UserDao" ref ="UserDao" /> </bean >
再建立一个com/it/annotation/UserController.java:
1
2
3
4
5
6
7
8
9
10
11
12
13
14
15
package com.it.annotation;import org.springframework.stereotype.Controller;import javax.annotation.Resource;@Controller("userController") public class UserController { @Resource(name="userService") private UserService userService; public void save () { this .userService.save(); System.out.println("Controller Save!!" ); } }
创建一个自动扫描那些标注Bean的xml文件com/it/annotation/Beans.xml:
1
2
3
4
5
6
7
8
9
10
11
12
13
14
15
<?xml version="1.0" encoding="UTF-8" ?> <beans xmlns ="http://www.springframework.org/schema/beans" xmlns:xsi ="http://www.w3.org/2001/XMLSchema-instance" xmlns:context ="http://www.springframework.org/schema/context" xsi:schemaLocation ="http://www.springframework.org/schema/beans http://www.springframework.org/schema/beans/spring-beans.xsd http://www.springframework.org/schema/context http://www.springframework.org/schema/context/spring-context.xsd" > <context:component-scan base-package ="com.it.annotation" > </context:component-scan > </beans >
再创建main类,获取xml文件内容以及实例化xml中的Bean:
其中的Beans.xml文件获取在IDEA中只能以下面的路径进行,不能像书上那样的MyEclips中的方式:com/it/annotation/Beans.xml
1
2
3
4
5
6
7
8
9
10
11
12
13
14
package com.it.annotation;import org.springframework.context.ApplicationContext;import org.springframework.context.support.ClassPathXmlApplicationContext;public class AnnotationAssembleTest {public static void main (String[] a) { String xmlP= "src/main/java/com/it/annotation/Beans.xml" ; ApplicationContext applicationContext=new ClassPathXmlApplicationContext (xmlP); UserController userController=(UserController) applicationContext.getBean("userController" ); userController.save(); } }
打印输出以下内容,证明成功:
UseDao Save!!
UserService Save!!
Controller Save!!

Process finished with exit code 0
Spring的数据库开发
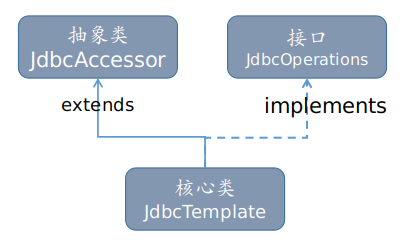
本章最主要的是JdbcTemplate,它是Spring JDBC的核心类,Spring框架的数据库开发基本都是围绕这个类来进行的,继承关系如下:
直接父类JdbcAccessor提供以下:
DataSource:获取数据库连接,还可以引入对数据库连接的缓冲池和分布式事务的支持。
JdbcOperations:接口定义了在JdbcTemplate类中可以使用的操作集合,包括添加、修改、查询和删除等操作。
SQLExceptionTranslator:该接口负责对SQLException进行转译工作。通过必要的设置获取SQLExceptionTranslator中的方法,可以使JdbcTemplate在需要处理SQLException时,委托SQLExceptionTranslator的实现类来完成相关的转译工作。
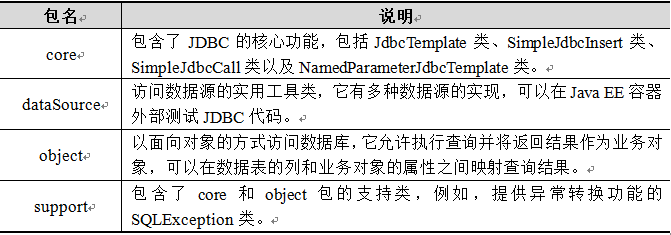
Spring JDBC模块主要由4个包组成:
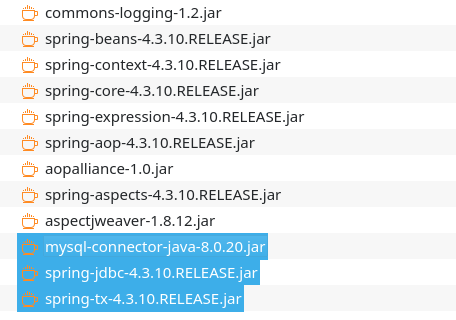
Spring数据库开发所需的jar包 请参考本文章之前的IDAR导入库以及添加classpath方法
第一个是Java数据库连接,(Java Database Connectivity,简称JDBC)是Java语言中用来规范客户端程序如何来访问数据库的应用程序接口,提供了诸如查询和更新数据库中数据的方法,jar包下载https://downloads.mysql.com/archives/c-j/
SpringJDBC的jar包(包含于Spring框架包)
Spring事物处理的jar包(包含于Spring框架包)
excute()方法执行sql语句 首先创建xml配置SpringBean的文件(书上基本上文件名称都是applicationContext.xml,但是Bean容器文件可以放于任何项目下的目录当中,且任意名称即可,只要在相应的ClassPathXmlApplicationContext()函数中写对xml路径即可),此文件名applicationJDBC.xml:
1
2
3
4
5
6
7
8
9
10
11
12
13
14
<?xml version="1.0" encoding="UTF-8" ?> <beans xmlns ="http://www.springframework.org/schema/beans" xmlns:xsi ="http://www.w3.org/2001/XMLSchema-instance" xsi:schemaLocation ="http://www.springframework.org/schema/beans http://www.springframework.org/schema/beans/spring-beans.xsd" > <bean id ="dataSource" class ="org.springframework.jdbc.datasource.DriverManagerDataSource" > <property name ="driverClassName" value ="com.mysql.jdbc.Driver" /> <property name ="url" value ="jdbc:mysql://localhost:3306/ding" /> <property name ="username" value ="数据库用户名" /> <property name ="password" value ="用户名的密码" /> </bean > <bean id ="jdbcT" class ="org.springframework.jdbc.core.JdbcTemplate" > <property name ="dataSource" ref ="dataSource" > </property > </bean > </beans >
以上的两个Bean的class分别来自上面导入的包,其中的<property name="dataSource" ref="dataSource"></property>说明JdbcTemplate类中一定包含setDataSource的类似于构造方法的函数将DriverManagerDataSource类传递过去作为依赖。
创建含有excute()方法的Java文件:
1
2
3
4
5
6
7
8
9
10
11
12
13
14
15
16
17
18
19
20
21
package com.example.JDBC_Template;import org.springframework.context.ApplicationContext;import org.springframework.context.support.ClassPathXmlApplicationContext;import org.springframework.jdbc.core.JdbcTemplate;public class jdbcTemplateTest { public static void main (String[] args) { ApplicationContext applicationContext=new ClassPathXmlApplicationContext ("applicationJDBC.xml" ); JdbcTemplate jdbcTemplate=(JdbcTemplate)applicationContext.getBean("jdbcT" ); jdbcTemplate.execute("create table student(" + "id int primary key auto_increment," + "name varchar(50)," + "grade varchar(100)," + "age int )" ); System.out.println("~~~~~~~~~~~~~~~创建表格成功~~~~~~~~~~~~~~~~~~" ); } }
如果运行成功,则会打印~~~~~~~~~~~~~~~创建表格成功~~~~~~~~~~~~~~~~~~,并在相应的数据库表中可查看表结构:
1
2
3
4
5
6
7
8
9
10
MySQL [fuding]> desc student; +-------+--------------+------+-----+---------+----------------+ | Field | Type | Null | Key | Default | Extra | +-------+--------------+------+-----+---------+----------------+ | id | int | NO | PRI | NULL | auto_increment | | name | varchar(50) | YES | | NULL | | | grade | varchar(100) | YES | | NULL | | | age | int | YES | | NULL | | +-------+--------------+------+-----+---------+----------------+ 4 rows in set (0.018 sec)
注意: 建表时一定要优先使用英文字段名,并且于JavaBean中的变量名称保持一致,不然会出现执行jdbcTemplate.query(all,rows)方法不成功(具体原因往下参阅),就会出现:
SudentInfo{id=0, name='null', age=0, grade='null'}
SudentInfo{id=0, name='null', age=0, grade='null'}
SudentInfo{id=0, name='null', age=0, grade='null'}
update()方法,插入、更新、删除操作
update()方法可以完成插入、更新和删除数据的操作。在JdbcTemplate类中,提供了一系列的update()方法,其常用方法下表所示:
虽然一共有4中使用方式,但最常用的还是第四种方式,下面的插入、更新、删除都是以第4种的方式来写的:
创建JavaBean,定义好于数据库字段一致且类型一致的变量,右击鼠标->Generate->Getter and Setter生成以下:
1
2
3
4
5
6
7
8
9
10
11
12
13
14
15
16
17
18
19
20
21
22
23
24
25
26
27
28
29
30
31
32
33
34
35
36
37
38
39
40
41
42
43
44
45
46
47
48
49
50
51
package com.example.JDBC_Template.Update_Query;public class SudentInfo { int id; String name; int age; String grade; public int getId () { return id; } public void setId (int id) { this .id = id; } public String getName () { return name; } public void setName (String name) { this .name = name; } public int getAge () { return age; } public void setAge (int age) { this .age = age; } public String getGrade () { return grade; } public void setGrade (String grade) { this .grade = grade; } @Override public String toString () { return "SudentInfo{" + "id=" + id + ", name='" + name + '\'' + ", age=" + age + ", grade='" + grade + '\'' + '}' ; } }
创建Dao设计模式的接口StudentDao:
1
2
3
4
5
6
7
8
9
10
package com.example.JDBC_Template.Update_Query;import java.util.List;public interface StudentDao { public int addStudent (SudentInfo sudentInfo) ; public int updateStudent (SudentInfo sudentInfo) ; public int delStudent (int id) ; }
创建实现以上的接口的方法StudentDaoImp:
1
2
3
4
5
6
7
8
9
10
11
12
13
14
15
16
17
18
19
20
21
22
23
24
25
26
27
28
29
30
31
32
33
34
35
36
37
38
39
40
41
42
43
44
45
46
47
48
49
50
51
52
package com.example.JDBC_Template.Update_Query;import org.springframework.jdbc.core.BeanPropertyRowMapper;import org.springframework.jdbc.core.JdbcTemplate;import org.springframework.jdbc.core.RowMapper;import java.util.List;public class StudentDaoImp implements StudentDao { JdbcTemplate jdbcTemplate; public void setJdbcTemplate (JdbcTemplate jdbcTemplate) { this .jdbcTemplate = jdbcTemplate; } @Override public int addStudent (SudentInfo sudentInfo) { String sql="insert into student(name,grade,age) values(?,?,?)" ; Object[] objects=new Object []{ sudentInfo.getName(), sudentInfo.getGrade(), sudentInfo.getAge(), }; int rs=jdbcTemplate.update(sql,objects); return rs; } @Override public int updateStudent (SudentInfo sudentInfo) { String sql="update student set name=?,grade=?,age=? where id=?" ; Object[] objects=new Object []{ sudentInfo.getName(), sudentInfo.getGrade(), sudentInfo.getAge(), sudentInfo.getId() }; int rs=jdbcTemplate.update(sql,objects); return rs; } @Override public int delStudent (int id) { String sql="delete from student where id=?" ; return jdbcTemplate.update(sql,id); } }
由于StudentDaoImp方法需要依赖JdbcTemplate,于是在相应的配置文件中装配为Bean,配置依赖的方法:
1 2 3 <bean id ="studentDao" class ="com.example.JDBC_Template.Update_Query.StudentDaoImp" > <property name ="jdbcTemplate" ref ="jdbcT" > </property > </bean >
注意: property标签中 name="jdbcTemplate"一定要StudentDaoImpclass中有与其对应的setJdbcTemplate(类似于构造方法)
创建执行以上update的方法:
在软件开发过程中,需要有相应的测试工作。依据测试目的不同,可以将软件测试分为单元测试、集成测试、确认测试和系统测试等。其中单元测试在软件开发阶段是最底层的测试,它易于及时发现并解决问题。JUnit就是一个进行单元测试的开源框架,为了方便测试,需要将Junit库导入classpath,来使用Junit。
以下代码中的@Test即是Junit用来单元测试的注释,如果要在IDEA中正常使用,操作如下:
在要进行单元测试的方法前加入@Test->出现红色提示->将鼠标指向红色Test->点击Add Junit to ClassPath此操作完成后要测试的方法右边就会出现一个绿色的小三角形(点击可运行没有在mian方法中的代码)
1
2
3
4
5
6
7
8
9
10
11
12
13
14
15
16
17
18
19
20
21
22
23
24
25
26
27
28
29
30
31
32
33
34
35
36
37
38
package com.example.JDBC_Template.Update_Query;import org.junit.Test;import org.springframework.context.ApplicationContext;import org.springframework.context.support.ClassPathXmlApplicationContext;import java.util.List;public class UpdateQuery { public static void main (String[] args) { ApplicationContext applicationContext=new ClassPathXmlApplicationContext ("applicationJDBC.xml" ); StudentDao studao=(StudentDao) applicationContext.getBean("studentDao" ); SudentInfo sudentInfo=new SudentInfo (); sudentInfo.setAge(22 ); sudentInfo.setGrade("1班" ); sudentInfo.setName("付" ); int sturs = studao.addStudent(sudentInfo); System.out.println("添加了" +sturs+ "行学生数据!!" ); } @Test public void DeleteStu () { ApplicationContext applicationContext=new ClassPathXmlApplicationContext ("applicationJDBC.xml" ); StudentDao studao=(StudentDao) applicationContext.getBean("studentDao" ); System.out.println("删除了" +studao.delStudent(2 )+"行学生数据" ); } @Test public void upDate () { ApplicationContext applicationContext=new ClassPathXmlApplicationContext ("applicationJDBC.xml" ); StudentDao studao=(StudentDao) applicationContext.getBean("studentDao" ); SudentInfo stu=new SudentInfo (); stu.setName("王麻子" ); stu.setAge(100 ); stu.setGrade("终极一班" ); stu.setId(1 ); System.out.println("更改了" +studao.updateStudent(stu)+"行!!" ); } }
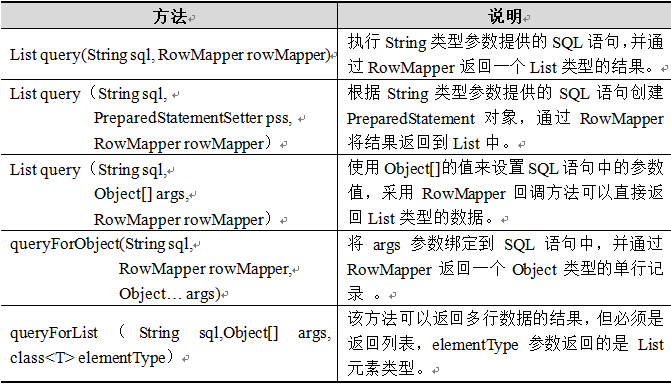
query()处理各种对数据库表的查询操作
JdbcTemplate类中还提供了大量的query()方法来处理各种对数据库表的查询操作。其中,常用的几个query()方法如下表所示:
以上的1和4都是常用的
接口StudentDao中添加以下两个接口:
1
2
public List<SudentInfo> QueryAllInfo () ; public SudentInfo QueryA (int id) ;
StudentDaoImp中添加实现以上的接口的方法:
sping中的RowMapper可以将数据中的每一行数据封装成用户定义的类。
1
2
3
4
5
6
7
8
9
10
11
12
13
@Override public List<SudentInfo> QueryAllInfo () { String all="select * from student" ; RowMapper<SudentInfo> rows=new BeanPropertyRowMapper <SudentInfo>(SudentInfo.class); return jdbcTemplate.query(all,rows); } @Override public SudentInfo QueryA (int id) { String stu="select * from student where id=?" ; RowMapper<SudentInfo> rowMapper=new BeanPropertyRowMapper <>(SudentInfo.class); return jdbcTemplate.queryForObject(stu,rowMapper,id); }
运行测试:
1
2
3
4
5
6
7
8
9
10
11
12
13
14
15
16
17
18
19
20
21
22
23
24
25
26
package com.example.JDBC_Template.Update_Query;import org.junit.Test;import org.springframework.context.ApplicationContext;import org.springframework.context.support.ClassPathXmlApplicationContext;import java.util.List;public class UpdateQuery { @Test public void QueryAllStudents () { ApplicationContext applicationContext=new ClassPathXmlApplicationContext ("applicationJDBC.xml" ); StudentDao studao=(StudentDao) applicationContext.getBean("studentDao" ); List<SudentInfo> list= studao.QueryAllInfo(); for (SudentInfo i:list) { System.out.println(i); } } @Test public void QueryAStudent () { ApplicationContext applicationContext=new ClassPathXmlApplicationContext ("applicationJDBC.xml" ); StudentDao studao=(StudentDao) applicationContext.getBean("studentDao" ); SudentInfo s=studao.QueryA(2 ); System.out.println(s); } }
运行结果:
QueryAllStudents():
SudentInfo{id=1, name='铸鼎', age=9, grade='三年级'}
SudentInfo{id=2, name='铸鼎鼎', age=22, grade='专升本1班'}
QueryAStudent():
SudentInfo{id=2, name='铸鼎鼎', age=22, grade='专升本1班'}
Spring的事物管理
在实际开发中,操作数据库时都会涉及到事务管理问题,为此Spring提供了专门用于事务处理的API。Spring的事务管理简化了传统的事务管理流程,并且在一定程度上减少了开发者的工作量。
需要之前Spring的数据库开发图中的所有包,详情请看Spring的数据库开发所需的jar包
在Spring的所有JAR包中,包含一个名为spring-tx-4.3.6.RELEASE的JAR包,该包就是Spring提供的用于事务管理的依赖包,包中有3个重要的接口:
PlatformTransactionManager,用于获取事务状态信息
TransactionStatus getTransaction(TransactionDefinition definition);用于获取事务状态信息
void commit(TransactionStatus status);用于提交事务
void rollback(TransactionStatus status);用于回滚事务
TransactionDefinition,用于提交事务
String getName( );获取事务对象名称
int getIsolationLevel( );获取事务的隔离级别
int getPropagationBehavior( );获取事务的传播行为
int getTimeout( );获取事务的超时时间
boolean isReadOnly( );获取事务是否只读
ransactionStatus,用于回滚事务
void flush();刷新事务
boolean hasSavepoint();获取是否存在保存点
boolean isCompleted();获取事务是否完成
boolean isNewTransaction();获取是否为新事务
boolean isRollbackOnly();获取事务是否回滚
void setRollbackOnly();设置事务回滚
上述方法中,事务的传播行为是指在同一个方法中,不同操作前后所使用的事务。传播行为有很多种,具体如下表所示:
在事务管理过程中,传播行为可以控制是否需要创建事务以及如何创建事务,通常情况下,数据的查询不会影响原数据的改变,所以不需要进行事务管理,而对于数据的插入、更新和删除操作,必须进行事务管理。如果没有指定事务的传播行为,Spring默认传播行为是REQUIRED。
基于XML方式
事务管理方式有两种:编程式事务管理、声明式事务管理
配置<tx:advice>元素的重点是配置<tx:method>子元素,上图中使用灰色标注的几个属性是<tx:method>元素中的常用属性。其属性描述具体如下:
在之前的StudentDao接口中添加以下代码:
1 public void transfer (String outUser,String inUser,Double money) ;
在之前的StudentDaoImp实现类中添加实现方法:
1
2
3
4
5
6
7
8
9
10
11
12
13
@Override public void transfer (String outUser, String inUser, Double money) { jdbcTemplate.update("update client set balance=balance-?" +"where name=?" ,money,outUser ); int i=20 /0 ; jdbcTemplate.update( "update client set balance =balance+?" + "where name=?" ,money,inUser ); }
在之前的applicationJDBC.xml 添加以下代码:
在ntelliJ IDEA 2020.3.2 (Ultimate Edition)版本上测试,写xml配置文件时自动生成的spring XML配置文件引用的xml约束不对,作者去官网找到了比较全面的bean引用的约束,写于下方代码中才可以使配置元素 ‘tx:advice’ 中允许出现属性 ‘transaction-manager’
1
2
3
4
5
6
7
8
9
10
11
12
13
14
15
16
17
18
19
20
21
22
23
24
25
26
27
28
29
30
31
32
33
34
35
36
37
38
39
40
41
42
43
44
45
<?xml version="1.0" encoding="UTF-8" ?> <beans xmlns ="http://www.springframework.org/schema/beans" xmlns:xsi ="http://www.w3.org/2001/XMLSchema-instance" xmlns:context ="http://www.springframework.org/schema/context" xmlns:aop ="http://www.springframework.org/schema/aop" xmlns:tx ="http://www.springframework.org/schema/tx" xsi:schemaLocation ="http://www.springframework.org/schema/aop http://www.springframework.org/schema/aop/spring-aop-4.3.xsd http://www.springframework.org/schema/beans http://www.springframework.org/schema/beans/spring-beans-3.2.xsd http://www.springframework.org/schema/tx http://www.springframework.org/schema/tx/spring-tx-4.3.xsd http://www.springframework.org/schema/context http://www.springframework.org/schema/context/spring-context-4.3.xsd" > <bean id ="dataSource" class ="org.springframework.jdbc.datasource.DriverManagerDataSource" > <property name ="driverClassName" value ="com.mysql.jdbc.Driver" /> <property name ="url" value ="jdbc:mysql://主机名:3306/数据库名" /> <property name ="username" value ="用户名" /> <property name ="password" value ="密码" /> </bean > <bean id ="jdbcT" class ="org.springframework.jdbc.core.JdbcTemplate" > <property name ="dataSource" ref ="dataSource" > </property > </bean > <bean id ="studentDao" class ="com.example.JDBC_Template.Update_Query.StudentDaoImp" > <property name ="jdbcTemplate" ref ="jdbcT" > </property > </bean > <bean id ="transactionManager" class ="org.springframework.jdbc.datasource.DataSourceTransactionManager" > <property name ="dataSource" ref ="dataSource" > </property > </bean > <tx:advice id ="txAdvice" transaction-manager ="transactionManager" > <tx:attributes > <tx:method name ="*" propagation ="REQUIRED" isolation ="DEFAULT" read-only ="false" /> </tx:attributes > </tx:advice > <aop:config > <aop:pointcut id ="txPointcut" expression ="execution(* com.example.JDBC_Template.Update_Query.*.*(..))" /> <aop:advisor advice-ref ="txAdvice" pointcut-ref ="txPointcut" > </aop:advisor > </aop:config > </beans >
编写测试方法:
1
2
3
4
5
6
7
8
9
10
public class TransactionTest { @Test public void xmlTest () { ApplicationContext applicationContext=new ClassPathXmlApplicationContext ("applicationJDBC.xml" ); StudentDao studentDao= (StudentDao)applicationContext.getBean("studentDao" ); studentDao.transfer("fuding" ,"malei" ,1000.1 ); System.out.println("转账成功!!" ); } }
如果事物管理器生效,执行以上代码会出现:
注释掉int i=20/0;,就会执行成功:
基于注解方式 1 2 3 4 5 6 7 8 9 10 11 12 13 14 15 16 17 18 19 20 21 22 23 24 <bean id ="transactionManager" class ="org.springframework.jdbc.datasource.DataSourceTransactionManager" > <property name ="dataSource" ref ="dataSource" > </property > </bean > <tx:annotation-driven transaction-manager ="transactionManager" > </tx:annotation-driven >
再将TransactionTest.java中添加:
1
2
3
4
5
6
7
8
9
10
public class TransactionTest { @Test @Transactional(propagation = Propagation.REQUIRED,isolation = Isolation.DEFAULT,readOnly = false) public void xmlTest () { ApplicationContext applicationContext=new ClassPathXmlApplicationContext ("applicationJDBC.xml" ); StudentDao studentDao= (StudentDao)applicationContext.getBean("studentDao" ); studentDao.transfer("fuding" ,"malei" ,1000.1 ); System.out.println("转账成功!!" ); } }
测试运行:


 支付宝
支付宝 🧧
🧧 微信
微信